| Skip Navigation Links | |
| Exit Print View | |

|
Connecting Systems Using Reactive Network Configuration in Oracle Solaris 11.1 Oracle Solaris 11.1 Information Library |
| Skip Navigation Links | |
| Exit Print View | |

|
Connecting Systems Using Reactive Network Configuration in Oracle Solaris 11.1 Oracle Solaris 11.1 Information Library |
1. Reactive Network Configuration (Overview)
2. Creating and Configuring Reactive Network Profiles (Tasks)
3. Administering Your Reactive Network Configuration (Tasks)
4. Using the Network Administration Graphical User Interface
Introduction to the Network Administration Graphical User Interface
Accessing the Network Administration GUI From the Desktop
Differences Between the Network Administration GUI and the Network CLI
Functional Components of the GUI
Interacting With Reactive Network Profiles From the Desktop
Checking the Status of Your Network Connection
How to Show Details About an Enabled Network Connection
Controlling Network Connections From the Desktop
About the Network Preferences Dialog
Viewing Information About Network Profiles
How to Switch From One Network Profile to Another Network Profile
Adding or Removing a Network Profile
How to Edit a Fixed Network Profile
How to Add or Remove Connections
How to Move a Network Connection to the Always Enabled Group
How to Remove a Network Connection
Creating and Managing Locations
How to Change a Location's Activation Mode
How to Switch From One Location to Another Location
About External Network Modifiers
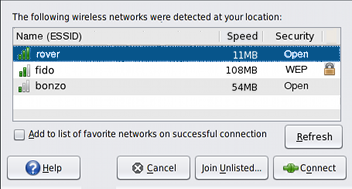
By default, when wireless network connection is enabled, reactive network configuration attempts to connect to any available network in the favorites list, without asking, in the priority order in which the connections are listed. If no favorite networks are available, the Wireless Chooser dialog opens. In this dialog you can choose which wireless network to join.
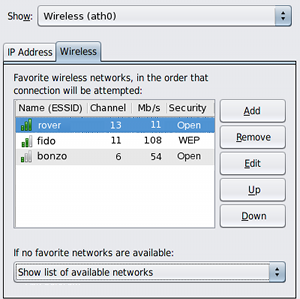
You can also modify the way in which connections to wireless networks are attempted in the Wireless tab of the Network Preferences dialog's Connection Properties view. When a reactive profile is active, you can manually connect to a different wireless network by accessing the Network Status notification icon's contextual menu.
Tip - You can access the Connection Properties view for a selected network through the Network Preferences dialog. This dialog contains a drop-down list that is labeled, Show. This list enables you to switch between views for a given network. In each view, there are different tasks you can perform and information about the selected network that is specific to that view.
The following views exist for every network connection in each network profile that is on the system:
Connection status
Network profile
Connection properties
For more information about working with network profiles, including a description of the Network Preferences dialog, see Managing Network Profiles.
Wireless networks are joined by choosing the Join Wireless Network option that is available by right-clicking the Network Status notification icon. The Wireless Chooser dialog is where you select a wireless network to connect to, from the list of available networks that is displayed.
An unlisted wireless network has been configured so that it does not broadcast its network name, yet is still available to join.
This dialog is displayed automatically when there is a choice of available wireless networks to join.
Figure 4-1 Wireless Chooser Dialog

Note - You cannot manually select a different wireless network when a fixed network profile is active.
For more details about the information that you might need to provide, refer to the network administration GUI online help.
By default, when you join a wireless network for the first time, a check box that is labeled, Add to list of favorite networks on successful connection, is displayed in the Join Wireless Network dialog.
To add the wireless network to your list of favorites, if the connection is successful, select this box. If you do not want the network to be added to your list of favorites, deselect the box. The box is selected by default.
To add a wireless network that is not currently available, or not currently broadcasting its network name to your favorites list, go to the Wireless tab of the Connection Properties view, then click the Add button. To add the network, you need to know its network name, security type, and security key.
Figure 4-2 Wireless Tab of the Connection Properties View
