| Skip Navigation Links | |
| Exit Print View | |

|
Oracle Solaris 11.1 Administration: Devices and File Systems Oracle Solaris 11.1 Information Library |
| Skip Navigation Links | |
| Exit Print View | |

|
Oracle Solaris 11.1 Administration: Devices and File Systems Oracle Solaris 11.1 Information Library |
1. Managing Removable Media (Tasks)
2. Writing CDs and DVDs (Tasks)
4. Dynamically Configuring Devices (Tasks)
5. Managing USB Devices (Tasks)
6. Using InfiniBand Devices (Overview/Tasks)
9. Administering Disks (Tasks)
11. Configuring Storage Devices With COMSTAR (Tasks)
12. Configuring and Managing the Oracle Solaris Internet Storage Name Service (iSNS)
13. The format Utility (Reference)
14. Managing File Systems (Overview)
15. Creating and Mounting File Systems (Tasks)
16. Configuring Additional Swap Space (Tasks)
17. Copying Files and File Systems (Tasks)
18. Managing Tape Drives (Tasks)
How to Display Tape Drive Status
Handling Magnetic Tape Cartridges
Retensioning a Magnetic Tape Cartridge
Rewinding a Magnetic Tape Cartridge
You specify a tape or device to use for backup by supplying a logical device name. This name points to the subdirectory that contains the “raw” device file and includes the logical unit number of the drive. Tape drive naming conventions use a logical, not a physical, device name. The following table shows this naming convention.
Table 18-2 Basic Device Names for Backup Devices
|
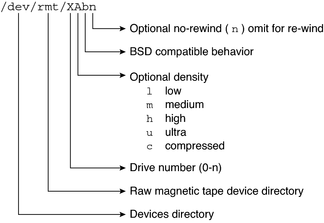
In general, you specify a tape device as shown in the following figure.
Figure 18-1 Tape Drive Device Names

If you don't specify the density, a tape drive typically writes at its “preferred” density. The preferred density usually means the highest density the tape drive supports. Most SCSI drives can automatically detect the density or format on the tape and read it accordingly. To determine the different densities that are supported for a drive, look at the /dev/rmt subdirectory. This subdirectory includes the set of tape device files that support different output densities for each tape.
Also, a SCSI controller can have a maximum of seven SCSI tape drives.
Normally, you specify a tape drive by its logical unit number, which can run from 0 to n. The following table describes how to specify tape device names with a rewind or a no-rewind option.
Table 18-3 Specifying Rewind or No-Rewind for a Tape Drive
|
By default, the drive writes at its “preferred” density, which is usually the highest density the tape drive supports. If you do not specify a tape device, the command writes to drive number 0 at the default density the device supports.
To transport a tape to a system whose tape drive supports only a certain density, specify a device name that writes at the desired density. The following table describes how to specify different densities for a tape drive.
Table 18-4 Specifying Different Densities for a Tape Drive
|
The additional density values are shown in Backup Device Names.