| Skip Navigation Links | |
| Exit Print View | |

|
Managing User Accounts and User Environments in Oracle Solaris 11.1 Oracle Solaris 11.1 Information Library |
| Skip Navigation Links | |
| Exit Print View | |

|
Managing User Accounts and User Environments in Oracle Solaris 11.1 Oracle Solaris 11.1 Information Library |
1. Managing User Accounts and User Environments (Overview)
2. Managing User Accounts by Using the Command-Line Interface (Tasks)
3. Managing User Accounts by Using the User Manager GUI (Tasks)
Introducing the User Manager GUI
How to Start the User Manager GUI
Organization of the User Manager Panel
Selecting a Default Name-Service Scope and Type
Assuming a Role or Changing User Credentials
How to Change a User's Credentials
Adding, Modifying, and Deleting Users and Roles by Using the User Manager GUI
How to Add a User or Role With the User Manager GUI
How to Modify a User or Role With the User Manager GUI
Deleting a User or Role With the User Manager GUI
Administering Advanced Settings With the User Manager GUI
Administering Groups With the User Manager GUI
Administering Roles With the User Manager GUI
How to Administer Roles With the User Manager GUI
Administering Rights Profiles With the User Manager GUI
How to Administer Rights Profiles With the User Manager GUI
The following information is described in this section:
Use the Advanced Settings dialog box of the User Manager GUI to assign additional security attributes to a user, for example, rights profiles, roles, and authorizations.
For an overview of the security features that are supported in Oracle Solaris, see Part I, Security Overview, in Oracle Solaris 11.1 Administration: Security Services. For a detailed explanation of how role-based access control (RBAC) works in this release, see Part III, Roles, Rights Profiles, and Privileges, in Oracle Solaris 11.1 Administration: Security Services.
To administer advanced attributes for a user or role, select the user or role in the main User Manager panel, then click the Advanced Settings button. The Advanced Settings panel for the current user or role is displayed. The current user's name is displayed in parentheses at the top of the panel.
The following figure shows the Advanced Settings panel, with the Roles security attribute of the user john selected.

The following security attributes can be administered in the Advanced Settings panel:
Groups
Roles
Rights Profiles
Authorizations
Groups are administered in the main User Manager dialog box of the User Manager GUI by clicking the Advanced Settings button.
The Advanced Settings panel is displayed.
A list of the available groups and a list of the groups that the current user belongs to are displayed.
The added group is displayed in the Assigned Groups list.
The changes are not applied until you click Apply or OK in the main User Manager panel.
Roles are administered in the main User Manager dialog box of the User Manager GUI by clicking the Advanced Settings button.
Note - The Roles attribute is available only for a user, not for a role, because roles can only be assigned to users.
The following figure shows the Advanced Settings panel, with the Roles security attribute of the user john selected.

The Advanced Settings panel is displayed.
A list of the available roles and a list of the roles that are assigned to the current user are displayed.
The added role is displayed in the Assigned Roles list.
The changes are not applied until you click Apply or OK in the main User Manager panel.
Rights profiles are administered in the main User Manager dialog box of the User Manager GUI by clicking the Advanced Settings button.
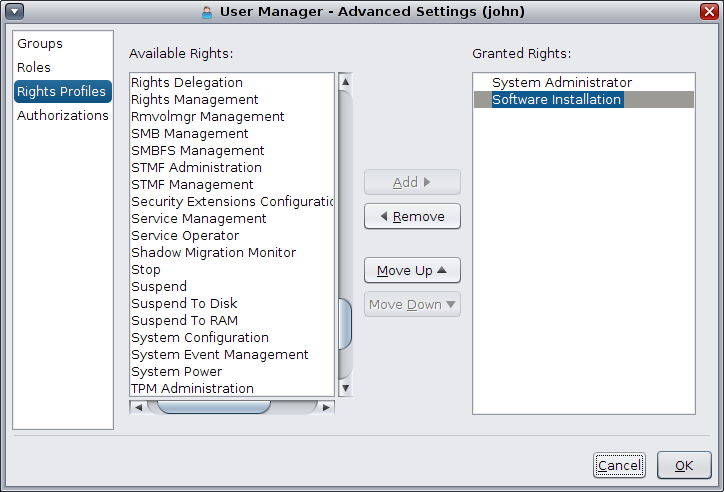
The following figure shows the Advanced Settings panel, with the Rights Profile security attribute of the user john selected.

Note - The assignment of rights profiles has an order precedence. Use the Move Up and Move Down buttons to change the order of the rights profiles that are granted to the current user, as desired.
The Advanced Settings panel is displayed.
A list of the available rights profiles and a list of the rights profiles that are granted to the current user are displayed.
The added rights profile is displayed in the Granted Rights Profiles list.
The changes are not applied until you click Apply or OK in the main User Manager panel.
A user generally is granted authorizations indirectly through a rights profile. Authorization settings can be used to grant a specific authorization to a user or role. Some authorizations might have additional attributes, such as an object name. For example, when an administrator creates the group games, the administrator is granted an implicit authorization: solaris.group.manage/games. The object names are then displayed in the Granted Authorizations list.
The Advanced Settings panel is displayed.
A list of the available authorizations and a list of the authorizations that are granted to the current user are displayed.
The added authorization is displayed in the Granted Authorizations list.
The changes are not applied until you click Apply or OK in the main User Manager panel.