| Skip Navigation Links | |
| Exit Print View | |

|
Oracle Solaris 11.1 Desktop User's Guide Oracle Solaris 11.1 Information Library |
| Skip Navigation Links | |
| Exit Print View | |

|
Oracle Solaris 11.1 Desktop User's Guide Oracle Solaris 11.1 Information Library |
1. Getting Started With the Desktop
3. Using the Desktop Workspaces
About the General Properties Tab
About the Background Properties Tab
Interacting With Panel Objects
How to Add an Object to a Panel
Modifying the Properties of an Object
How to Modify the Properties of an Object
How to Add a Launcher to a Panel From the Panel Pop-up Menu
How to Add a Launcher to a Panel From a Menu
How to Add a Launcher to a Panel From the File Manager
How to Modify the Launcher Properties
Launcher Commands and Locations
How to Add a Menubar or Main Menu to a Panel
How to Add a Submenu to a Panel
How to Add a Menu as a Drawer to a Panel
How to Add an Object to a Drawer
How to Modify Drawer Properties
5. Using the Desktop Applications
This section covers the panel objects that appear in the Oracle Solaris Desktop.
The menubar contains the Applications, Places, and System menus. You can access almost all of the standard applications, commands, and configuration options from the menubar. For more information about using the menubar, see Chapter 6, Using the Main Menubar.
Figure 4-10 Main Menubar

You can view a list of all windows that are currently open. You can also select a window to give focus to. To view the window list, click the Window Selector applet. The following figure shows an example of the Window Selector applet.
Figure 4-11 Window Selector Applet

To give focus to a window, select the window from the Window Selector applet. The Window Selector lists the windows in all workspaces. The windows in all workspaces other than the current workspace are listed under a separator line.
The Notification Area applet displays icons from various applications to indicate activity in the application. For example, when you use the CD Player application to play a CD, a CD icon is displayed in the Notification Area applet.
The Window List applet enables you to manage the windows that are open on the Oracle Solaris Desktop. Window List uses a button to represent each window or group of windows that are open. The state of the buttons in the applet varies depending on the state of the window that the button represents. The following table describes the possible states of the Window List buttons.
Table 4-6 Window List Button States
|
You can use the Window List to perform the following tasks:
Give focus to a window that is on the desktop which previously did not have focus.
Minimize the window that has focus.
Restore a minimized window.
You can change the order of the buttons by dragging a button to a different location on the Window List.
To configure the Window List, right-click the handle to the left of the window buttons, and then choose Preferences. The following preferences can be changed:
Window List Content – To specify which windows to display in the Window List, select one of the following options:
Show windows from current workspace – Shows only the windows that are open in the current workspace.
Show windows from all workspaces – Shows the windows that are open in all workspaces.
Window Grouping – To specify when the Window List should group windows that belong to the same application, select one of the following options:
Never group windows – Windows of the same application are never grouped under one button.
Group windows when space is limited – Windows of the same application are grouped under one button when the space on the panel is restricted.
Always group windows – Windows of the same application are always grouped under one button.
Restoring Minimized Windows – To define how the Window List behaves when you restore windows, select one of the following options.
Restore to current workspace – Windows from the applet will be restored to the current workspace even if the window did not previously reside in the current workspace.
Restore to native workspace – The focus will switch to the workspace in which the window originally resided.
These options are only available if Show Windows From All Workspaces is selected in the Window List Content section of the dialog.
The Command Assistant applet provides quick access to Oracle Solaris documentation such as man pages and administration guides, based on the given search query.
By default, the Command Assistant applet is not installed. You can install the Command Assistant applet by using packagemanager(1) or by typing the following command as a root user:
# pkg install cmdassist
After installing the Command Assistant applet, you have to manually add the applet to a panel. For more information about adding launchers to a panel, see How to Add a Launcher to a Panel From the Panel Pop-up Menu.
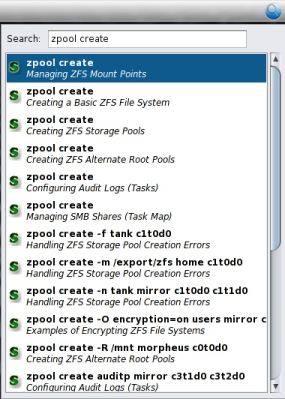
The Command Assistant applet displays a list of references to the documentation that can be opened in a browser by clicking the required reference. The search terms are matched against the available command-line examples in documentation, making it easy to find references for commands. For example, you can access useradd, zpool create, and many other commands.
The following example shows the available commands in documentation that you can use with the zpool create command.
Figure 4-12 Command Assistant Search Example
