| Skip Navigation Links | |
| Exit Print View | |

|
Trusted Extensions User's Guide Oracle Solaris 11.1 Information Library |
| Skip Navigation Links | |
| Exit Print View | |

|
Trusted Extensions User's Guide Oracle Solaris 11.1 Information Library |
1. Introduction to Trusted Extensions
2. Logging In to Trusted Extensions (Tasks)
3. Working in Trusted Extensions (Tasks)
Visible Desktop Security in Trusted Extensions
Trusted Extensions Logout Process
How to Lock and Unlock Your Screen
How to Log Out of Trusted Extensions
How to View Your Files in a Labeled Workspace
How to Access the Trusted Extensions Man Pages
How to Access Initialization Files at Every Label
How to Interactively Display a Window Label
How to Perform Some Common Desktop Tasks in Trusted Extensions
How to Change Your Password in Trusted Extensions
How to Log In at a Different Label
How to Allocate a Device in Trusted Extensions
How to Deallocate a Device in Trusted Extensions
How to Assume a Role in Trusted Extensions
How to Change the Label of a Workspace
How to Add a Workspace at Your Minimum Label
How to Switch to a Workspace at a Different Label
How to Move a Window to a Different Workspace
How to Determine the Label of a File
How to Move Data Between Windows of Different Labels
The following security-related tasks require the trusted path.
 | Caution - If the trusted symbol is missing when you are attempting a security-related action, contact your security administrator at once. The problem on your system could be serious. |
Unlike the Oracle Solaris OS, Trusted Extensions provides a GUI for changing your password. The GUI grabs the pointer until the password operation is completed. To stop a process that has grabbed the pointer, see Example 3-5.
To select the password menu item, click Trusted Path in the trusted stripe.
Figure 3-3 Trusted Path Menu
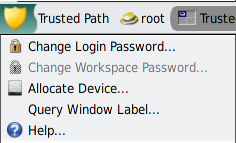
Note - The Trusted Path menu item Change Workspace Password is active when your site is running a separate naming service per zone.
This action confirms that you are the legitimate user for this user name. For security reasons, the password is not displayed as you type.
 | Caution - When you type your password, make sure that the cursor is over the Change Password dialog box and that the trusted symbol is displayed. If the cursor is not over the dialog box, you might inadvertently type your password into a different window where the password could be seen by another user. If the trusted symbol is not displayed, then someone might be attempting to steal your password. Contact your security administrator at once. |
Note - If you chose Change Password and your site is using local accounts, your new password does not go into effect until the zone or the system is rebooted. To reboot the zone, you must be assigned the Zone Security rights profile. To reboot the system, you must be assigned the Maintenance and Repair rights profile. If you are not assigned one of these profiles, contact your system administrator to schedule a reboot.
Example 3-5 Testing If the Password Prompt Can Be Trusted
On an x86 system that has a Sun keyboard, the user has been prompted for a password. The mouse pointer has been grabbed and is positioned in the password dialog box. To check that the prompt is trusted, the user presses the Meta-Stop keys simultaneously. If the pointer remains in the dialog box, the user knows that the password prompt is trusted.
If the pointer does not remain in the dialog box, the user knows that the password prompt cannot be trusted. The user then must contact the administrator.
The label of the first workspace that appears in subsequent login sessions after the first login can be set to any label within your label range.
Users can configure the startup session characteristics for every label at which they log in.
Before You Begin
You must be logged in to a multilevel session.
For details, see How to Add a Workspace at Your Minimum Label.
For details, see How to Perform Some Common Desktop Tasks in Trusted Extensions.
The Allocate Device menu item enables you to mount and allocate a device for your exclusive use. If you try to use a device without allocating it, you get the error message “Permission Denied”.
Before You Begin
You must be authorized to allocate a device.
The devices that you are permitted to allocate at your current label appear under Available Devices:.
audion – Indicates a microphone and speaker
cdromn – Indicates a CD-ROM drive
floppyn – Indicates a diskette drive
mag_tapen – Indicates a tape drive (streaming)
rmdiskn – Indicates a removable disk, such as a JAZ or ZIP drive, or USB hot-pluggable media
The following dialog box indicates that you are not authorized to allocate devices:
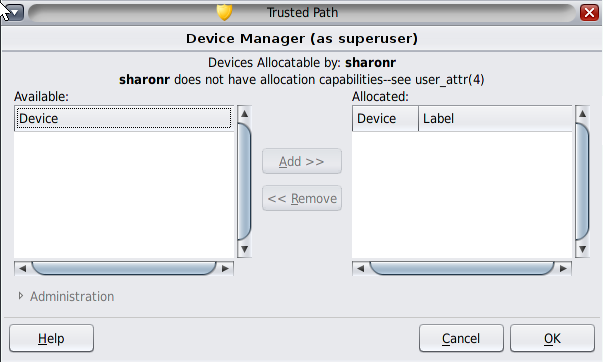
Move the device from the Available Devices list to the Allocated Devices list.
This step starts the clean script. The clean script ensures that no data from other transactions remains on the media.
Note that the label of the current workspace is applied to the device. Any data transferred to or from the device's media must be dominated by this label.
The instructions ensure that the media has the correct label. For example, the following instructions appear for microphone use:
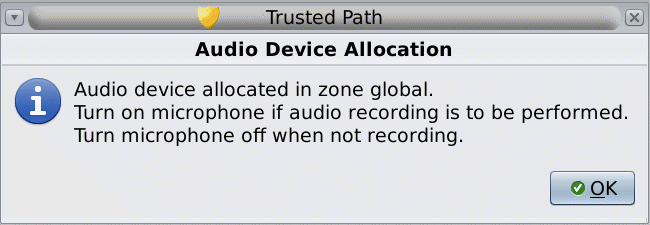
Then, the device is mounted. The device name now appears in the Allocated Devices list. This device is now allocated for your exclusive use.
Troubleshooting
If the device that you want to use does not appear in the list, check with your administrator. The device could be in an error state or in use by someone else. Or, you might not be authorized to use the device.
If you switch to a different role workspace or to a workspace at a different label, the allocated device cannot work at that label. To use the device at the new label, you need to deallocate the device at the initial label, and then allocate the device at the new label. When you move the Device Manager to a workspace at a different label, the Available and Allocated Devices lists change to reflect the correct context.
If a File Browser window does not appear, open the window manually, then navigate to the root directory, /. In this directory, navigate to the allocated device to view its contents.
The device is now available for use by another authorized user.
Unlike the Oracle Solaris OS, Trusted Extensions provides a GUI for assuming a role.
This action confirms that you can legitimately assume this role. For security reasons, the password is not displayed as you type.
 | Caution - When you type your password, make sure that the cursor is over the Change Password dialog box and that the trusted symbol is displayed. If the cursor is not over the dialog box, you might inadvertently type your password into a different window where the password could be seen by another user. If the trusted symbol is not displayed, then someone might be attempting to steal your password. Contact your security administrator at once. |
After the role password is accepted, the current workspace becomes the role workspace. You are in the global zone. You can perform the tasks that are permitted by the rights profiles in your role.
The ability to set workspace labels in Trusted Extensions provides a convenient means of working at different labels within the same multilevel session.
Use this procedure to work in the same workspace at a different label. To create a workspace at a different label, see How to Add a Workspace at Your Minimum Label.
Before You Begin
You must be logged in to a multilevel session.
You can also click a workspace panel.

The following illustration shows the user clicking the Trusted Path button.
Figure 3-4 Label Builder
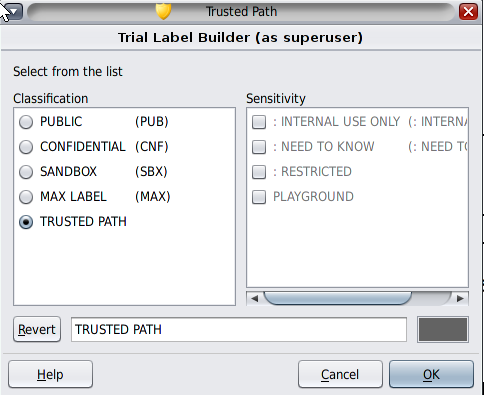
After clicking this button, the user can select from the user labels. The workspace label is changed to the new label. On a system where labels are color-coded, new windows are marked with the new color.
If your site is running a separate naming service per zone, users are prompted for a password when entering a workspace at a new label.
The ability to set workspace labels in Trusted Extensions provides a convenient means of working at different labels within the same multilevel session. You can add a workspace at your minimum label.
To change the label of the current workspace, see How to Change the Label of a Workspace.
Before You Begin
You must be logged in to a multilevel session.
The new workspaces are created at your minimum label. You can also use this dialog box to name the workspaces. The name appears in the tooltip.
When the mouse hovers over the workspace panel, the name appears in the tooltip.
For details, see How to Change the Label of a Workspace.
Before You Begin
You must be logged in to a multilevel session.
If your site is running a separate naming service per zone, users are prompted for a password when entering a workspace at a new label.
Troubleshooting
If you are logged in to a single-level session, you must log out to work at a different label. Then, log in at the desired label. If you are permitted, you can also log in to a multilevel session.
If you drag a window to a workspace at a different label, the window retains its original label. Any actions in that window is performed at the label of the window, not at the label of the containing workspace. Moving a window is useful when you want to compare information. You might also want to use applications at different labels without moving between workspaces.
The dragged window now appears in the second workspace.
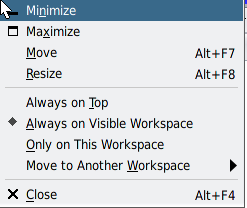
The selected window now appears in every workspace.
Usually, the label of a file is obvious. However, if you are allowed to view files at a lower label than your current workspace, the label of a file might not be obvious. In particular, the label of a file can be different from the label of the File Browser.
As on an Oracle Solaris system, you can move data between windows in Trusted Extensions. However, the data must be at the same label. When you transfer information between windows with different labels, you are upgrading or downgrading the sensitivity of that information.
Before You Begin
Your site's security policy must permit this type of transfer, the containing zone must permit relabeling, and you must be authorized to move data between labels.
Therefore, your administrator must have completed the following tasks:
You must be logged in to a multilevel session.
For details, see How to Add a Workspace at Your Minimum Label.
For details, see How to Determine the Label of a File.
For details, see How to Move a Window to a Different Workspace.
The Selection Manager Confirmation dialog box is displayed.
Figure 3-5 Selection Manager Confirmation Dialog Box
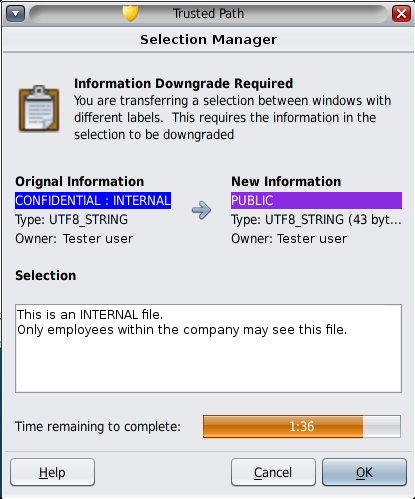
This dialog box:
Describes why confirmation of the transaction is needed.
Identifies the label and the owner of the source file.
Identifies the label and the owner of the destination file.
Identifies the type of data that was selected for transfer, the type of the target file, and the size of the data in bytes. By default, the selected data is visible in text format.
Indicates the time that remains for you to complete the transaction. The amount of time and the use of the timer depends on your site's configuration.
Multilevel datasets in Trusted Extensions ease the task of relabeling files. For more information about multilevel datasets, see Multilevel Datasets for Relabeling Files in Trusted Extensions Configuration and Administration.
Before You Begin
You must be authorized to relabel files. You can operate at two or more labels, one of which dominates the other.
A multilevel dataset is mounted in at least one of the labeled zones, and the mount name is identical, such as /multi, in every zone that mounts the dataset.
To permit relabeling, your administrator must have completed the following tasks:
You must be logged in to a multilevel session.
For example, to upgrade a file from PUBLIC to INTERNAL, create a workspace at the INTERNAL label.
For details, see How to Add a Workspace at Your Minimum Label.
In this example, the filename is temppub1.
$ ls /multi/public
temppub1
$ setlabel "cnf : internal" /multi/public/temppub1
$ getlabel  /multi/public/temppub1
/multi/public/temppub1: "CONFIDENTIAL : INTERNAL USE ONLY"
$ mv /multi/public/temppub1 /multi/internal/temppub1
To downgrade date, you first move the file to its target directory, then relabel it. For an explanation, see Multilevel Datasets for Relabeling Files in Trusted Extensions Configuration and Administration.
Before You Begin
You must be authorized to downgrade files. The administrator has mounted a multilevel dataset in at least one of the labeled zones, and has used a standard name, such as /multi, for all mounts of the dataset that you can access, and has permitted relabeling in that zone.
Therefore, your administrator must have completed the following tasks:
You must be logged in to a multilevel session.
For example, create an internal workspace.
For details, see How to Add a Workspace at Your Minimum Label.
% pfbash
$
For details, see How to Determine the Label of a File.
Note - If the source file is at the same label as its parent directory, it cannot be downgraded in place. You must move the file. Moving the file is a privileged operation.
$ mv /multi/internal-directory/file /multi/public-directory
$ cd /multi/public-directory
$ setlabel public file
$ getlabel /multi/public-directory/file
/multi/public-directory/file: PUBLIC
You can edit the file at the PUBLIC label.
Example 3-6 Changing the Label of a Directory
In this example, an authorized user relabels a directory.
First, the user moves or removes all files from the directory.
$ getlabel /multi/conf
/multi/conf: CONFIDENTIAL : NEED TO KNOW
$ mv /multi/conf/* /multi/confNTK/temp
Then, the user sets the label of the directory and verifies the new label.
$ setlabel "Confidential : Internal Use Only" /multi/conf
getlabel /multi/conf
/multi/conf: "CONFIDENTIAL : INTERNAL USE ONLY"